DIY: Patriotic Tie Dye Tank with Tumble Dye.
If you follow my blog you might know that I've been on a craft kick; see THIS post.
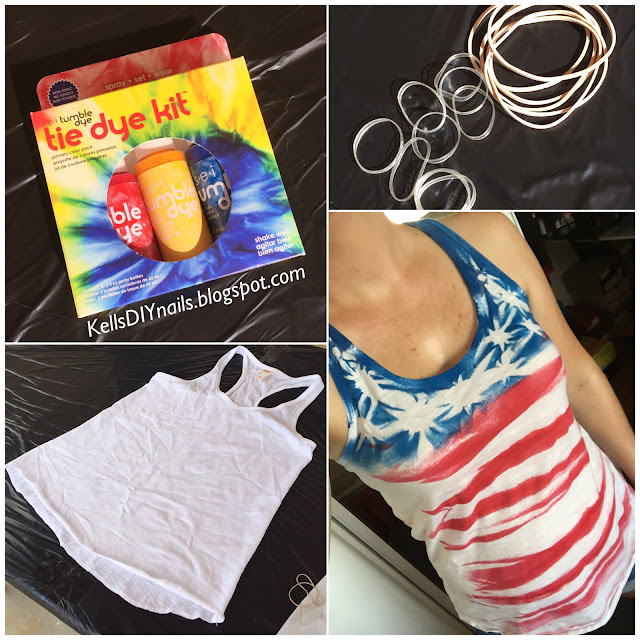
Tie Dye projects are not usually my thang because they are messy and tend to stain various things that you didn't want stained. My aversion to tie dye changed when I stumbled upon Tumble Dye (that rhyme wasn't planned). This is/can be an easier way to do tie dye. Follow me as I take you through my experience.
I found Tumble Dye when I was looking for Iron-On Letters for THIS project. My mind went crazy and came up with a ton of ideas on what colors and looks I wanted to do; one of which was a 'Patriotic' design. I knew I wanted to make a Red, White, and Blue tee or tank.
I was notified via Cartwheel of a great deal Target had on their Mossimo Loose Racerback Tank so I picked up some tanks and tees. These tanks are lightweight (kind of feel like a slub knit) and fit great; not too tight, a little on the long side, and flattering. I gave my tank a wash before proceeding with the tye dye process.
It's important to cover and/or protect your workspace because this Tumble Dye will slightly stain porous surfaces; I was able to clean it off of non-porous surfaces with a Mr. Clean Magic Eraser. I also got some on the concrete but luckily I hit it with cleaner quickly and got the majority of it out; the rest wasn't noticeable. It did wash off of my hands with a little bit of elbow grease. I used 2 jumbo trash bags over lapped to cover my outdoor table. Packing tape was ran the entire length of the overlap to prevent anything leaking under it.


There is an awesome method for stripes which I utilized to make red stripes. There are other cool methods like Traditional, Dip Dye, and Watercolor.

I laid my white tank out and started assembling the remaining supplies I would need; like rubber bands. I grabbed two different sizes. The larger ones will help me do the stripes and the little ones (those are actually tiny hair elastics) will help me make the bursts for the stars.

If you want to prevent your design from bleeding onto the back of the garment you should place a trash bag inside the garment. I plan on mimicking the design on the back. I just used a smaller tall kitchen trash bag.


Tie Dye projects are not usually my thang because they are messy and tend to stain various things that you didn't want stained. My aversion to tie dye changed when I stumbled upon Tumble Dye (that rhyme wasn't planned). This is/can be an easier way to do tie dye. Follow me as I take you through my experience.

I found Tumble Dye when I was looking for Iron-On Letters for THIS project. My mind went crazy and came up with a ton of ideas on what colors and looks I wanted to do; one of which was a 'Patriotic' design. I knew I wanted to make a Red, White, and Blue tee or tank.
I was notified via Cartwheel of a great deal Target had on their Mossimo Loose Racerback Tank so I picked up some tanks and tees. These tanks are lightweight (kind of feel like a slub knit) and fit great; not too tight, a little on the long side, and flattering. I gave my tank a wash before proceeding with the tye dye process.
It's important to cover and/or protect your workspace because this Tumble Dye will slightly stain porous surfaces; I was able to clean it off of non-porous surfaces with a Mr. Clean Magic Eraser. I also got some on the concrete but luckily I hit it with cleaner quickly and got the majority of it out; the rest wasn't noticeable. It did wash off of my hands with a little bit of elbow grease. I used 2 jumbo trash bags over lapped to cover my outdoor table. Packing tape was ran the entire length of the overlap to prevent anything leaking under it.

It was time to release the Tumble Dye from it's cardboard box; and of course review the instructions. I read them previously but it never hurts to refresh your memory.

There is an awesome method for stripes which I utilized to make red stripes. There are other cool methods like Traditional, Dip Dye, and Watercolor.

I laid my white tank out and started assembling the remaining supplies I would need; like rubber bands. I grabbed two different sizes. The larger ones will help me do the stripes and the little ones (those are actually tiny hair elastics) will help me make the bursts for the stars.

If you want to prevent your design from bleeding onto the back of the garment you should place a trash bag inside the garment. I plan on mimicking the design on the back. I just used a smaller tall kitchen trash bag.

1. Folded my tank up into pleats; they don't have to be perfect. I folded mine with the trash bag and other side of the tank because I wanted thicker lines. If you want smaller lines just pleat the one layer of your garment. Secure with large rubber bands on each end.
2. Spray on your color. Because the actual dye comes in a spray bottle it is easy to direct it exactly where you want the color to go.
3. After letting the dye dry and checking out your results you can do it again to add more lines/color.
4. Spray again and let dry. Lay your garment out flat to let dry completely before moving on.
(I also cleaned off the table after each dye application)

Once the red stripes were nice and dry I then moved onto the 'stars' section. I wanted the top of the tank to be blue with white bursts; this was my tie dye version of stars. This is where I used the smaller rubber bands; and FYI they kept wanting to fall off so it took me awhile to make sure my bands were secure. I just randomly pinched areas of the fabric and wound a rubber band on them. Then I sprayed it with the blue dye. When I shook the blue bottle; dye went flying. It was leaking out of the top of the sprayer (you can see it in the picture). This is where I took a break to spray down my concrete with cleaner. After letting it sit for a moment I carefully removed the trash bag so I wouldn't get blue dye all over other areas of the tank. Then I took off the tiny rubber bands (well, the ones that didn't fall off as I was carefully removing the trash bag).

I repeated all the above steps on the back of the tank as well; below is a photo of how I did the stars/bursts on the racerback part of the tank.

Once all the dye was dry on the tank I put it in the dryer for 20 minutes on high heat to set it. You can also iron it to set it. I recommend hand washing until you don't see any dye in the water. Then toss it in the washing machine. Otherwise, you will have dye transfer onto your skin.

Here I am rocking the finished product:

I love it and can't wait to make more! What about the cost breakdown? Tank $6 + Tumble Dye* $6.65 = $12.65. Not bad. I think I'm getting better at this. Plus I still have lots of dye left.
* Includes Red & Blue Tumble Dye and pro-rated shipping.
What do you think of my 'Patriotic' Tie Dye Tank? Have you ever done Tie Dye before?


That turned out great!!!
ReplyDeleteThanks, girl! I'm ready to do another one! Do you tie dye?
DeleteI haven't tie dyed in a long time, but I did do some regular dyeing on the stove here in the past few years. I had gotten some clearance white tops and also had many many white sports bras as they always came in each set I bought. I got a lot of pretty dyes from Dharma Trading. Fun but messy, so I haven't been in the mood for awhile now....wonder where all the white tops got to...lol
Delete